Category: Trade Secrets à la Koval
Blanket Sizes Chart
| January 23, 2019 | Filled under A la Koval Best Practices, Trade Secrets à la Koval |
Special Stitches | 3rd Loop HDC vs Back Loop HDC
| December 6, 2018 | Filled under A la Koval Best Practices, Trade Secrets à la Koval |
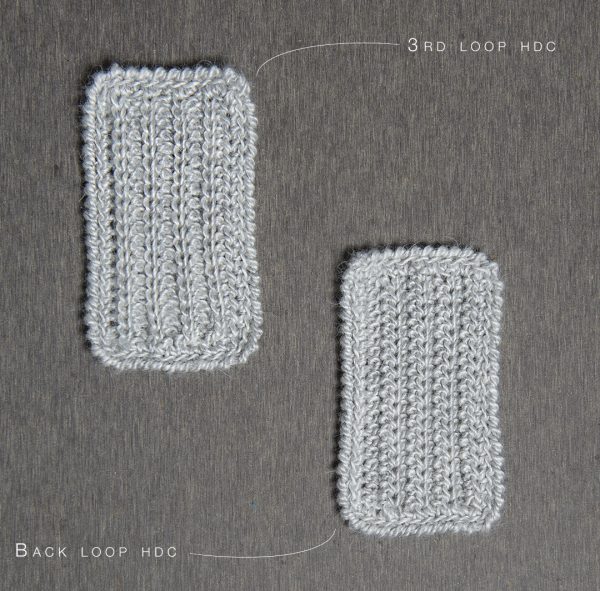
Is there really a difference between 3rd loop half double crochet (3rd loop hdc) and back loop half double crochet, and can I substitute them with each other❓A question that I get quite often.
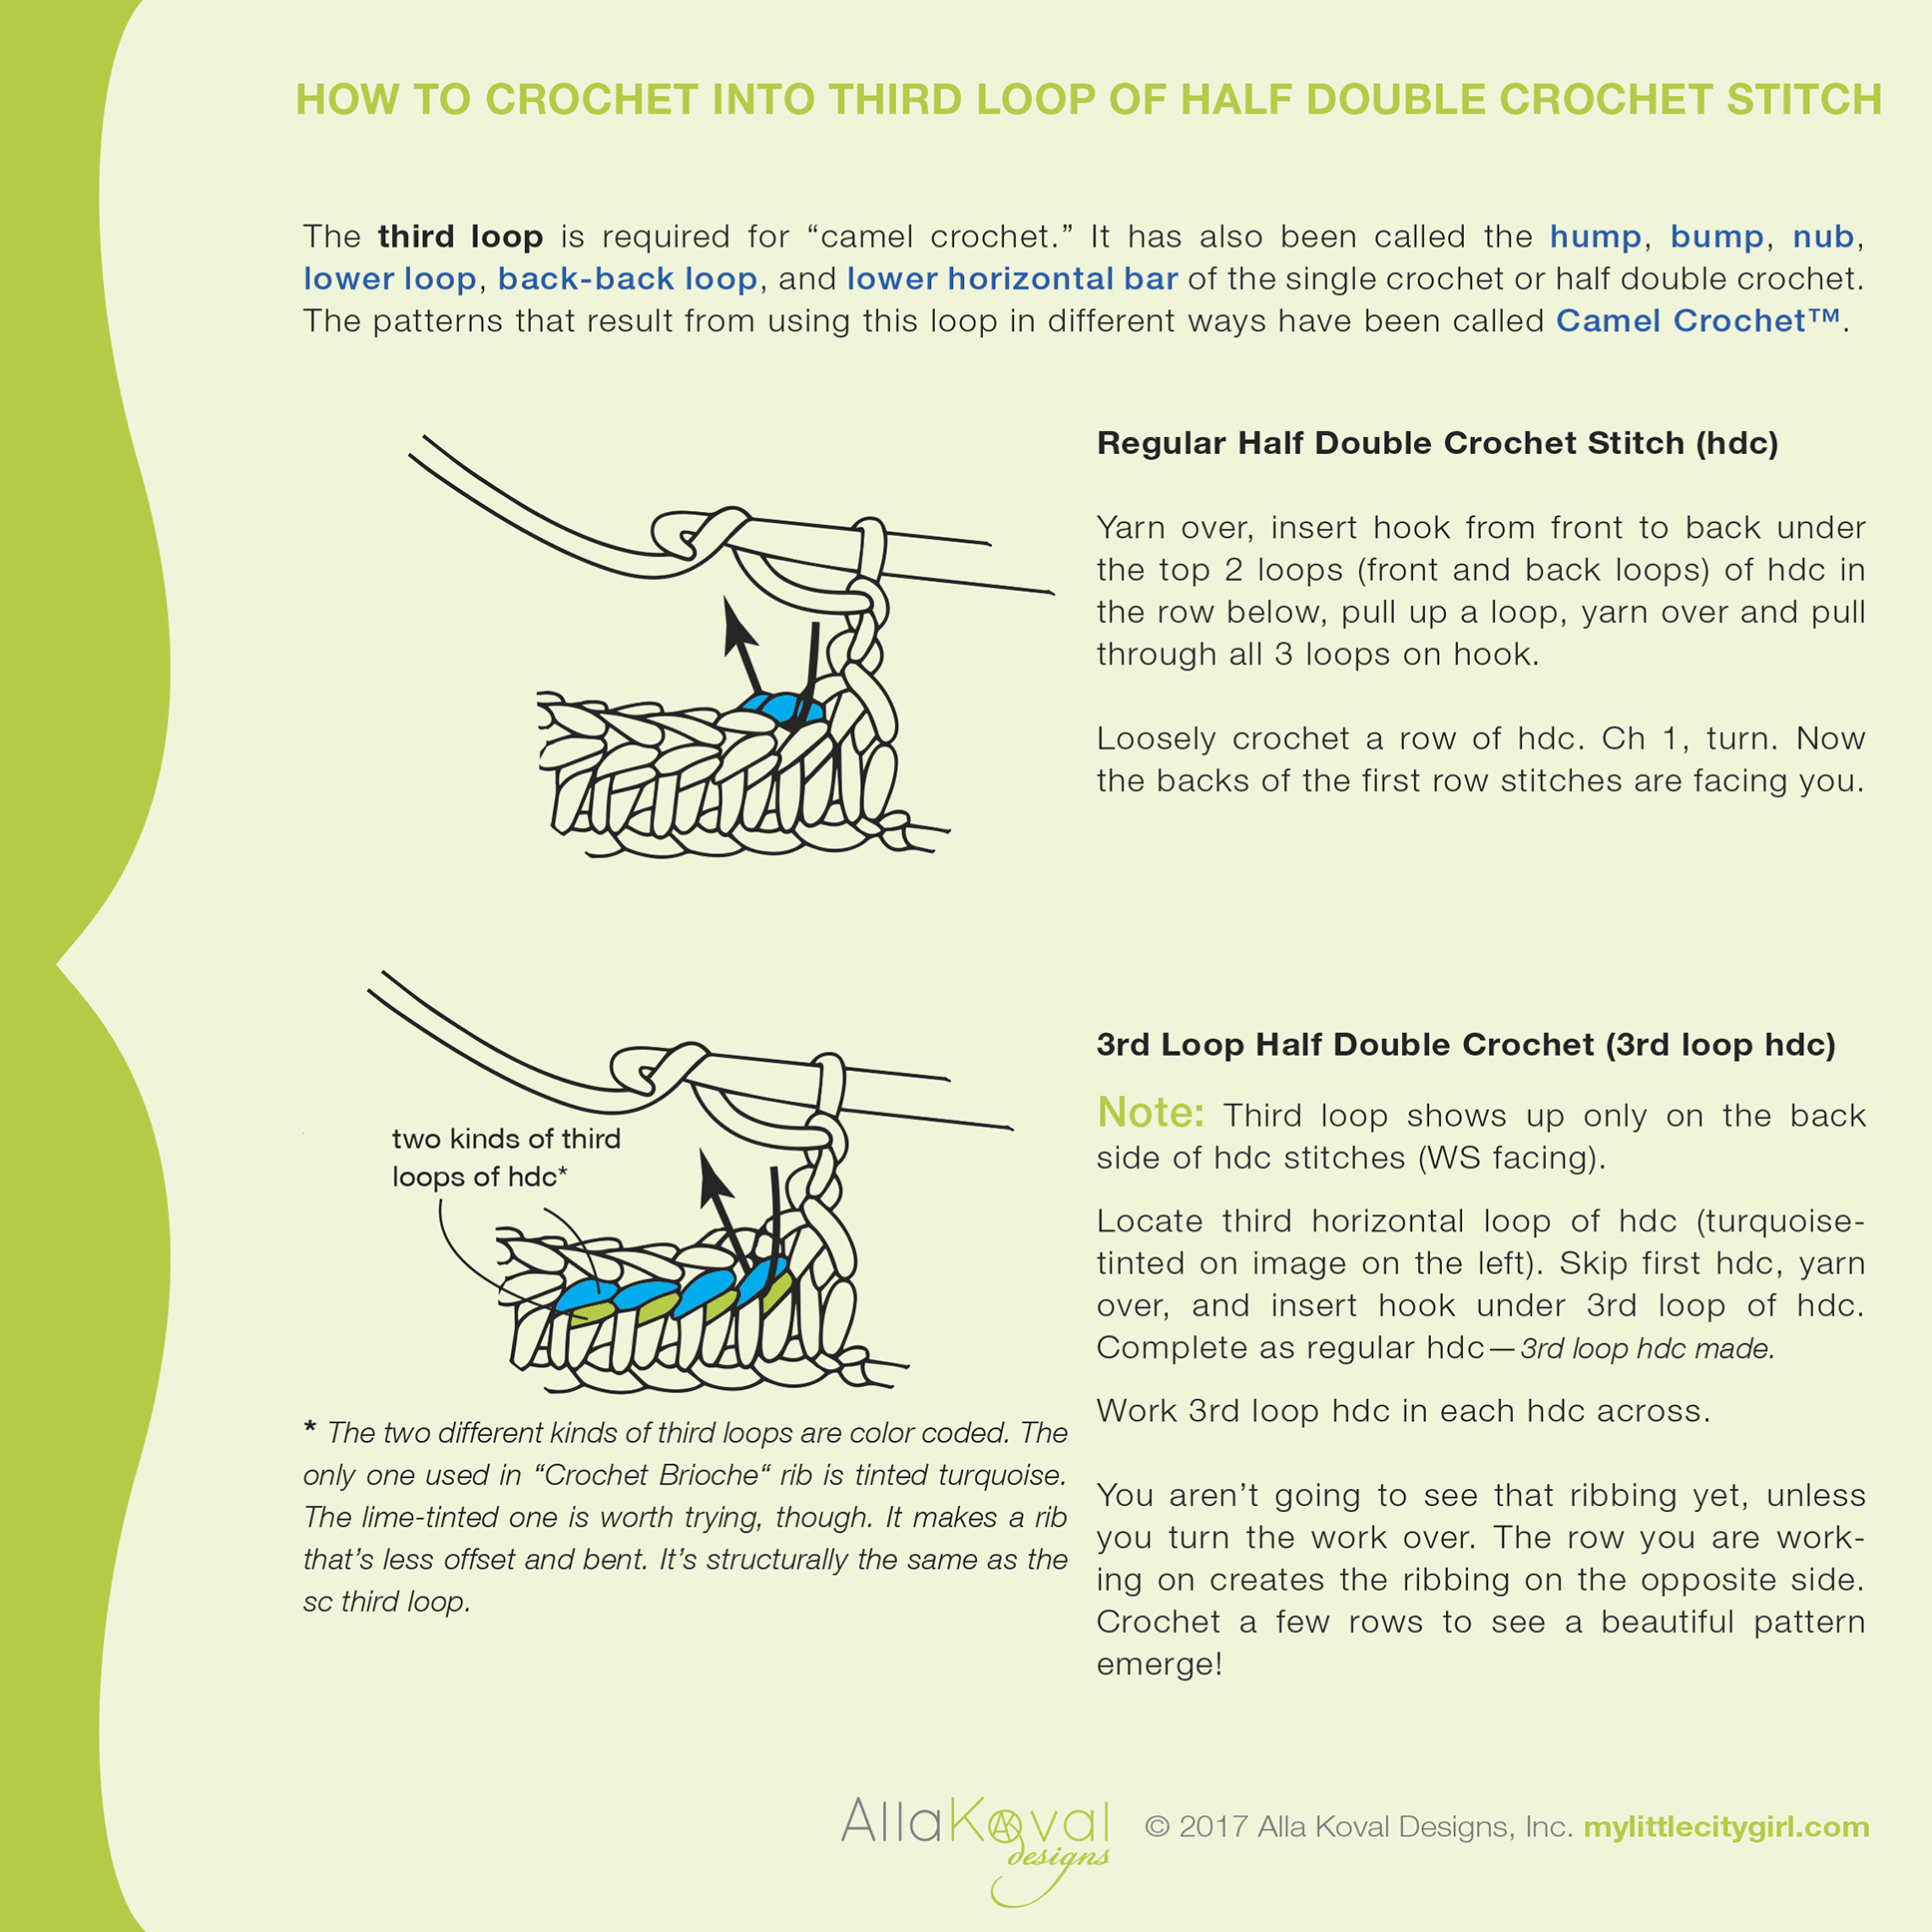
See the difference on the picture above and tutorial how to crochet 3rd loop hdc below:
⠀Of course, you can use any of these ways to crochet a rib hdc pattern. As a big fan of this simple but such versatile stitch, my favorite is a 3rd loop hdc for sure 🤓
The Perfect Brim
| November 6, 2014 | Filled under Creations, Trade Secrets à la Koval |

If you noticed, I’m a big fan of brimmed hats for girls of any age ;o) I have Rose Buds, and two another hat patterns with brim, which are available for free downloads: Garden Party & Design you Own Hat. BTW, the hat above is just an idea how you can turn Anastasia Beanie into hat with any size of brim. Anastasia Beanie + Brim = Hat.
Actually the hats crocheted with cotton yarn like Omega Sinfonia, Tahki Cotton Classic, King Tut holds the brim in place. But for hats made with thread or soft yarn, using craft wire on the outer edge prevent to flopping the brim down into your eyes and you can shape the hat to your liking. The way I got the brim to stand out like using 1/16 wire (found at local hardware store) that I crocheted into the hat during the last row.
Recently, after some research, I discovered millinery wire is the real stuff used on hats. My shipment arrives tomorrow and can hardly wait to try it out! Has anyone ever used this type of hat wire? If so, what has been your experience? Good or bad?
I’ve ordered 1.35 mm wire and nylon wire joiners at Judith M Millinery Supply House, such a nice and very informative place!
Using wire may be a bit tricky first time, but you will became a guru pretty fast. Oh, and if you would like me to share my way to work with wire, just hint, and I’ll glad to write a tutorial for you.
A Wonderful and productive Thursday everyone!!
Alla Koval Designs
Style Sheet for Patterns
| November 6, 2012 | Filled under Featured, My Book, Trade Secrets à la Koval, Writing a book |


Even if I have published my patterns since 2008, I am happy and proud owner of Style sheet for knitting and crochet patterns … finally :)

If you are looking for polishing your pattern-style or plan to start write patterns, I would highly recommend Edie Eckman’s How to Say It class. I learned what I was looking for I can’t be more happy with quite detailed and information filled lessons! Thank you so much Edie!!
Alla Koval Designs
How To Prevent “Bad Breaks” in Crochet & Knit Patterns. Formatting with InDesign CS5
| September 12, 2012 | Filled under Trade Secrets à la Koval, Writing a book |
I worked of final editing of first part of book, and technical editor drew my attention (Thanks a LOT!!) that patterns may be easier to track if there is no line breaks between the instruction and the number, as you can see it below – "ch 4" should be on the same line.

Well, actually it’s not a mistake and you may not care, but I do. And if you are working in InDesign, to fix these “bad breaks” will take just couple minutes – so why not ;o)
BUT, first of all. I would NOT recommend to fix these breaks manually by inserting white spaces or forced line breaks (Shift+Enter/Shift+Return). Not only it will take plenty amount of your time (especially if you are working on 150+ pages long document, and here is no guarantee that you will find all instances where it happened), but also you may get new worse breaks as shown below.
- “Ch 3” break was fixed by applying forced line breaks:

- Then we added “see Special Stitches and Notes” and look what happened (see second line, plus we’ve got another bad break – “32 V-sts”)

To prevent “bad breaks” with InDesign CS5*, the trick is to turn all instances needed to “No Break” style.
*I’ll no wonder if older versions of InDesign or other editors have the same “No Break” style feature or something like that.
[dropcap]1[/dropcap] Create new character (Go to Type > Character Style (Shift+11) > Create new style).
Set up:
– Style Name: No Break
– check “No Break“ check-box
– click OK.

I also assigned Character Color to see these styles. I’ll change color before release:

So now you have a Character Style which will prevent InDesing from breaking words. You may apply it manually (select 2-3 words in the paragraph and assign Character Style to the selection) and see how it works. Simply add text before selection to push it to the right and see how it will “jump” to the next line as single block.
Next step is to force InDesign to find all the places like “Ch 3” or “ch-5 sp” and similar and apply “No Break” style automatically for you.
[dropcap]2[/dropcap] Go to Type > Paragraph Styles (F11) > Your Paragraph Name Style (my is Paragraph) > Edit Paragraph

[dropcap]3[/dropcap] The feature what we are looking for is called “GREP” and it is one of the Paragraph Style Options.
Go to GREP Style and click "New GREP Style”.

Set up:
– Apply Style: No Break
– type into the field To Text this text: V-st
– check “Preview” check box to verify results – all “V-st” are highlighted in orange, which means that they are in “No Break” style. And if you add extra text to force line breaks you can see that our “V-sts” issue is fixed. BUT “32” is now on the different line with “V-sts”, so our goal, to prevent line break between instruction and number, is not met yet.

[dropcap]4[/dropcap] To prevent line break between instructions and numbers,
simple add 3 new GREP styles: just copy/paste these formulas (one per style, please ;):
(?i)\d\d*( |-)(ch|dc|tr|sl|V-st)
(?i)(ch|dc|tr|sl|st)( |-)\d\d*\**
(?i)(from |to |at )\*+
What above means is that:
– (?i) – means ignore case and treat capital or lower characters same way
– \d\d*\** – means one or more digits (followed by zero or many *)
– ( |-) – means one space or dash
– (ch|dc|tr|sl|V-st) – means ch, dc, tr, sl or V-st. You may add more to this expression, just separate sts with pipe |. Also please note that V-st has capital V but this doesn’t matter as we put (?i) to ignore case.
– (from |to |at ) – means “from “ or “to “ or “at “ including one space
– \*+ – means one or more *
So when InDesign will see a text matching one of defined expressions, it will apply selected style to that text:

AND that’s all & magic happened :o) Now you will have all corrections immediately as you type.
Then only thing you should be aware of – all that magic will work only in the selected Paragraph Style. If you have other Paragraph Style where you also need to block similar line breaks, you’ll have to add GREP Styles to that Paragraph Style also.
Oh, and make sure to change color of No Break characters back to regular one when you will find that everything work correctly and not least – before you send the document to the printer.
Another example is to apply bold style to all Rnds/Rows: at the beginning of each paragraph. For that, you can use this GREP Style:
^.*:
Which means:
– ^ – means beginning of Paragraph
– .* – means any character, zero or many times
– : – means, well it means itself – colon : ![]()
Enjoy!!
P.S.: BTW, did you hear about Adobe’s Creative Cloud? All Adobe applications are available for $49.99 a month in one year subscription, $79.99 per month without a subscription, or $29.99 a month for students and teachers for the entire collection of all applications, which adobe promises will be the latest version without ever needing to pay anything extra. If you want see if Creative Cloud is worth it, Adobe offers a free 30 day trial https://creative.adobe.com/plans.
Happy Thursday, everyone!!
Trade Secrets à la Koval. Gauge Swatch
| August 20, 2012 | Filled under Trade Secrets à la Koval |
Making sure your stitches are consistently the right size is very important when crocheting. And even if I perfectly understand it, I always hated to do that boring part – checking the crochet gauge… until I found pretty comfy and easier for me (and not least—much faster!) way to do it: work 3 full rows of swatch to check number of stitches and then continue work only on first 6-8 stitches (leaving rem sts unworked) to check rows gauge.

A PDF version is available for download on the right >>>

| Download: | gauge_swatch |
|---|---|
| Updated: | August 20, 2012 |
| Size: | 97.5 KiB |
You may already be familiar with some of these tricks and sure I may not be the first to employ or invest these techniques, but I will be glad if you find something new and useful here.
If you have how-to-questions about techniques I use in my patterns, please feel free to ask them here and I’ll do my best to create the tutorial or give helpful tips at least.
Happy Monday everyone!! Have a wonderful week, even if…

;o)
Trade Secrets à la Koval. Crochet Symbol Charts with Adobe Illustrator CS5
| February 26, 2012 | Filled under My Book, Trade Secrets à la Koval, Writing a book |
Even if I get asked a lot about how I draw my crochet diagrams, just about a week ago I started to use Adobe Illustrator and I really can’t describe how I’m happy with this drawing software and with a new and exactly look of my diagrams I wanted!! And as I promised, I’m so glad to share some helpful links and tips, which helped me a lot. So, let’s go!
Get started
If you don’t have this software, you may want to try trial version of Adobe Illustrator® CS5 first, which is fully functional and offers every feature of the product for you to test-drive. To get started, I would highly recommend Illustrator CS5 Essential Training by lynda. Take your time to watch this course, which includes a detailed explanation of the elements that make up vector graphics, and shows how to use each of Illustrator’s drawing tools. It’s really matters to pass first learning bumps and get comfortable with Ai tools first of all.
Creating crochet charts
To create the charts you will need a library of crochet symbols first of all. You have two options: create your own or purchase a crochet font like StitchingCrochet (or ready-made library if any is available for sell). Below are links to amazing video tutorials how to create diagrams in rounds using StitchinCrochet font by BayviewPaula (sure this technique will work for your custom created symbols too):
StitchinCrochet Tutorial: Part 1
StitchinCrochet Tutorial: Part 2
StitchinCrochet Tutorial: Part 3
StitchinCrochet Tutorial: Part 4
StitchinCrochet Tutorial: Part 5 (final)
Many thanks to Paula for such helpful and clever tutorials! It’s really everything you need to know for creating your very first crochet charts.
Making a library of crochet stitch symbols
Creating your own library of stich symbols makes a sense for several reasons:
- Custom style (stroke weight, cap, corners, etc.)
- Flexibility of work with symbols (to transform, change proportions):

![]()
- Ability to create any customs groups of symbols like petals, shells, etc.
- Create all symbols you needed (StitchingCrochet has most of them, but not all). Well, you may use both: font and partial library to adjust styles.
- Using cool tools (like Blend tool), which doesn’t work with fonts.
Amie, from Nexstitch, has great detailed tutorials on using Adobe Illustrator to create symbols and diagrams on her blog.
Below is a part of my library of symbols, which were created with Line Segment tool ![]() and Ellipse tool
and Ellipse tool ![]() . Make sure the symbols have same Width (mine are 25 px wide) and proportional Height values (sc – 25 px, hdc – 50 px, dc – 75 px, etc.). New Width and Height values can be specified in the Control panel at any time if needed.
. Make sure the symbols have same Width (mine are 25 px wide) and proportional Height values (sc – 25 px, hdc – 50 px, dc – 75 px, etc.). New Width and Height values can be specified in the Control panel at any time if needed.

Creating Shells
Probably there are other and more easy ways to do that, but so far I made Shells by using Envelope Distort.
[one_half]
[dropcap]1[/dropcap] Create a group of 5 dc and 2 hdc, transformed as shown below (click pictures to enlarge).

[/one_half]
[one_half_last]
[dropcap]2[/dropcap] Select all elements with Selection tool ![]() and go to Object > Envelope Distort > Make with Warp. In the Warp Options dialog box, select a warp style Arc. Click Preview check box to see the changes.
and go to Object > Envelope Distort > Make with Warp. In the Warp Options dialog box, select a warp style Arc. Click Preview check box to see the changes.

[/one_half_last]
[one_half]
[dropcap]3[/dropcap] Change Bend and Vertical Distortion parameters to get shape close to this (Blend: 30%, Vertical: –34%).

[/one_half]
[one_half_last]
[dropcap]4[/dropcap] Adjust size as desired. To reshape the envelope, drag any anchor point on the envelope with the Direct Selection tool ![]() if needed.
if needed.


[/one_half_last]
Creating charts of a row projects
I work on Sunlit Rose Bolero pattern now and will show you one of the ways how to create diagram in rows, especially if row is 193 sts wide.

NOTE: I work on a PC in Adobe Illustrator CS5. The set up on a Mac looks a little different and the keyboard shortcuts are different too.
[dropcap]1[/dropcap] Open up a new document File > New. Call it “Body Chart” for example.
Set up options:
- New Document Profile. Choose Custom.
- Size of document. To calculate a Width of document (important for Blend tool), simple multiply a width of ch (25 px) by number of chains (194): 25 px x 193 = 4825 px. For a High – set up 3000 px (it can be easy changed at any time if needed). Click OK.

[dropcap]2[/dropcap] Creating beg ch of 193 chs with Blend Tool.
First, start out by copy (Control + C)/pasting (Control + V) a chain stitch from a library of symbols to Body Chart document. Mine is called Crochet Symbols.ai (see screenshot below – highlighted in green). Zoom in to see it closer (look in the bottom, left corner of the workspace). Select a chain stitch with Selection tool ![]() and move a chain to lower left corner by set up next options:
and move a chain to lower left corner by set up next options:
- Reference Point (click at lower left corner of Reference Point icon)
- Set up X and Y value: X=0 px; Y=3000 px . This first chain is start of the blend.

[dropcap]3[/dropcap] Duplicate a chain by pasting (Control + V) or by dragging (my absolute favorite tool so far!): select a chain and Alt‑drag (Windows) or Option-drag (Mac OS) the selection. Set up for second chain (end of the blend): X=4800 px (4825 – 25); Y=3000 px. Set blending options by double-clicking the Blend tool ![]() or choosing Object > Blend > Blend Options. Spacing determines how many steps are added to the blend. Choose Specified Steps and set up 191 (2 chains we have already). Click OK.
or choosing Object > Blend > Blend Options. Spacing determines how many steps are added to the blend. Choose Specified Steps and set up 191 (2 chains we have already). Click OK.

[dropcap]4[/dropcap] Select both objects (chains). Choose Object > Blend > Make. Beginning chain is complete. Change layer name to Ch 193 or Beg Ch. Block layer to prevent any accidental changes (optional).

Some more ideas of using Blend tool. Add new layer. Rep steps 2-3, but with dc stitch and set up Spacing > Specified Steps = 95. Then choose Object > Blend > Make. You will get dc located in “every other” order.

Then create new layer. Rep steps steps 2-3, but with chain stitch placed between first two (X=25 px) and last two dc (X=4800 px). Set up Spacing > Specified Steps = 94. Then choose Object > Blend > Make. You got a row of Mesh pattern in a minutes, don’t you! Yes, you are right – here should be a beginning ch-4, but I’m not finished ;o) So, let’s go back to our Body Chart.

[dropcap]5[/dropcap] To add beg ch-3, you need to resize the artboard (add extra width value to the right). Select the Artboard tool ![]() , click to select an artboard. To resize the artboard, position the pointer on an edge or corner until the cursor changes to a double-sided arrow, and then drag to adjust. Or, specify new Width and Height values in the Control panel.
, click to select an artboard. To resize the artboard, position the pointer on an edge or corner until the cursor changes to a double-sided arrow, and then drag to adjust. Or, specify new Width and Height values in the Control panel.

[dropcap]6[/dropcap] Add new layer and name it Row 1. Copy (Control + C)/pasting (Control + V) a chain stitch from your “library of symbols” to Body Chart document. Align a chain stitch to the beg chain (you should see the word, “intersect” in blue).
Select the Rotate tool ![]() .
.
- To rotate the chain around point A, click once in the document window in point A to reposition the reference point. Then move the pointer away from the reference point and drag in a circular motion, holding down Alt (Windows) after you start to drag.
- Duplicate 2nd chain by dragging Alt-drag (Windows).
- Duplicate 3rd chain by pasting (Control + D). Group beg ch-3.

[dropcap]7[/dropcap] Copy (Control + C)/pasting (Control + V) a dc stitch (Wight value = 25 px, Height value = 75) from a library of symbols to Body Chart document. Set up: X=0 px, Y= 2990 px.

[dropcap]8[/dropcap] Copy (Control + C)/pasting (Control + V) a V-st stitch (Wight value = 75 px, Height value = 75) from a library of symbols to Body Chart document. Set up: X=25 px, Y= 2990 px. Adjust Width and Height values of V-st: Width = 70 (to make a space between V-st symbols of 2.5 px from each side); Height = 75 px. Adjust Height value of dc: Height = 71 px.

[dropcap]9[/dropcap] Duplicate V-st by dragging Alt-drag (Windows). Change Reference Point by clicking at right lower corner of Reference Point icon. Set up for V-st: X=4822.5 px, Y= 2990 px.

[dropcap]10[/dropcap] Set up blending options: Spacing > Specified Steps = 62. With Selection tool ![]() select both V-sts. Then choose Object > Blend > Make. To make second row, duplicate layer Row 1 and change beg sts. To make short rows, duplicate 1st V-st by dragging Alt-drag (Windows) and then duplicate symbol as many times as need by Ctr + D.
select both V-sts. Then choose Object > Blend > Make. To make second row, duplicate layer Row 1 and change beg sts. To make short rows, duplicate 1st V-st by dragging Alt-drag (Windows) and then duplicate symbol as many times as need by Ctr + D.

Looks as I’m completely hooked! ;o) To be continued…
[quote author=”- Amy Chua”] Nothing is fun until you’re good at it. [/quote]
Trade Secrets à la Koval. New Category Preview
| September 16, 2011 | Filled under Trade Secrets à la Koval |
As completely self taught knitter and crocheter, I found that I do some things in a different way than standard techniques, but most comfy and easier for me. I still receive pretty often emails with how-to-questions and planned set up a tips category since so long… and it’s finally here! You may already be familiar with some of these tricks and sure I may not be the first to employ or invest these techniques, but I will be glad if you find something new and useful here. And hear “Why didn’t I think of that?!” – even from experienced knitters and crocheters, is always a highest award for me. So, let’s go…
TIP #1. HOW TO GET AN EASY AND PRETTY PICOT. If you find that making picots are annoying and slowing down the crocheting process, try to make picot in this improvised way I usually do:

In this way, the picots are more pretty and stable, plus it’s easier and faster to make. Please take a moment to try it and share your thought.
What would you like next? If you have how-to-questions about techniques I use for my patterns, please feel free to ask them here and I’ll do my best to create the visual tutorial or give helpful tips.

 Shopping Cart


Lets Get Connected