Category: My Book
Thank You!!
| July 10, 2012 | Filled under My Book, Writing a book |
Thank you so much dear ladies for your comments about the diagrams!!
Personally I like first version much better too and I’m so glad we are on the same page, yay!! :o) The only thing I’ll probably change is orange to turquoise or lime green—let me see.
I would like to comment about some of the interesting points for the colors on the diagrams, as Krista and Mary mentioned:
[quote author="- Krista"]I like both for different reasons. I like the way you have your pattern “breaks” laid out in version 1 better. And I like the color scheme of version 2 better. The dark and light break it up perfect and don’t make it too busy(or maybe it’s just because there’s only 2 colors. Is the row red because it’s the repeat row? If so, then I think the red circle and dash lines do the trick just fine without the whole row being red.
Just my opinion. Hope it helps you to see how others look at it.[/quote]
[quote author="- Mary from Australia"]The first version definitely seems to me to have clearer definition! I always do prefer the charts, and, I think using a new colour for every line is the easiest to read quickly. If I am reading from a chart which is only printed in one colour, I actually use my coloured pens & retrace over each line using a new colour. Whilst this is a bit time consuming in the beginning, I still find it faster in the long run because I can quickly follow the current line I am up to without constantly stopping to check if I am following the correct line of symbols.[/quote]
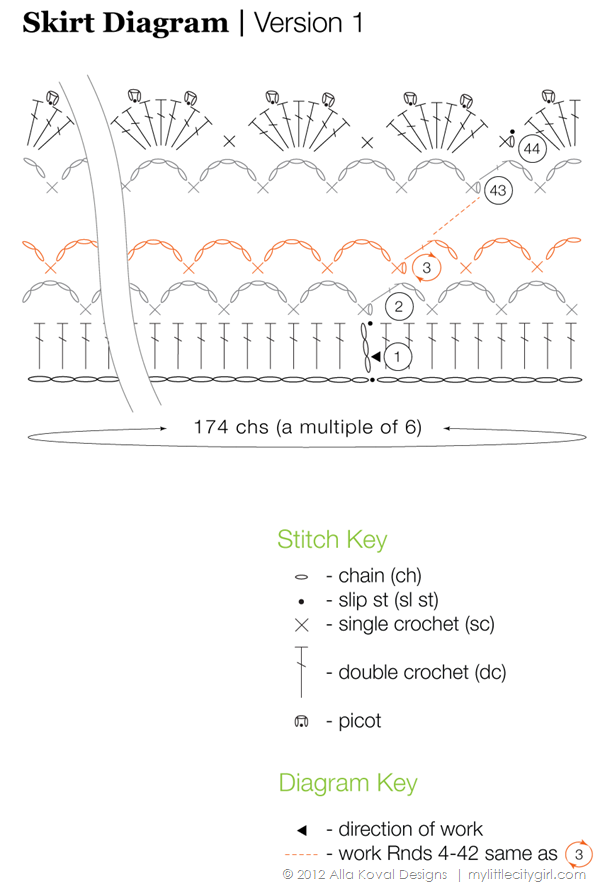
Kristal Motif (used for Petalline Halter Dress) is a good example of my final color preferences. It’s 21 rounds motif and I’ve tried different colors for every other round, but which would look “readable” in b&w print too. And then during testing (for 4 more garments using this motif), I found that my eyes prefer black and grey version much more. And if talking about style, I really like grey/black version better too. As Krista said, black and grey diagrams are not too busy and pretty readable. The contrasting turquoise, lime or tide of orange I use to highlight repeats, joining motifs, etc… It’s work so far, but I still play with my own style, so let me see ;o)
Also, many thanks to Amanda for comment about breaks:
[quote author="- Amanda"]I like version 1 better for the different colors, especially for row 3 and the repeated rows. I like version 2 better with the way you did the breaks. It seems more natural to me to have a continuation of the pattern around denoted with a dashed line rather then a break and a jump in pattern rows shown by a break rather then a dash. I love that you include the written instructions along with the chart. I like to read through the instructions before starting to make sure that I am reading the chart correctly.[/quote]
In diagrams with one repeat/continuation (example: blanket border) I really like to use that “weaves” break (like laid out in version 1) than dashed line. But break in version 2 looks not clear enough for me, even if probably seems more logical than in version 1. We will see how it will work with other diagrams, and find the best solution for sure.
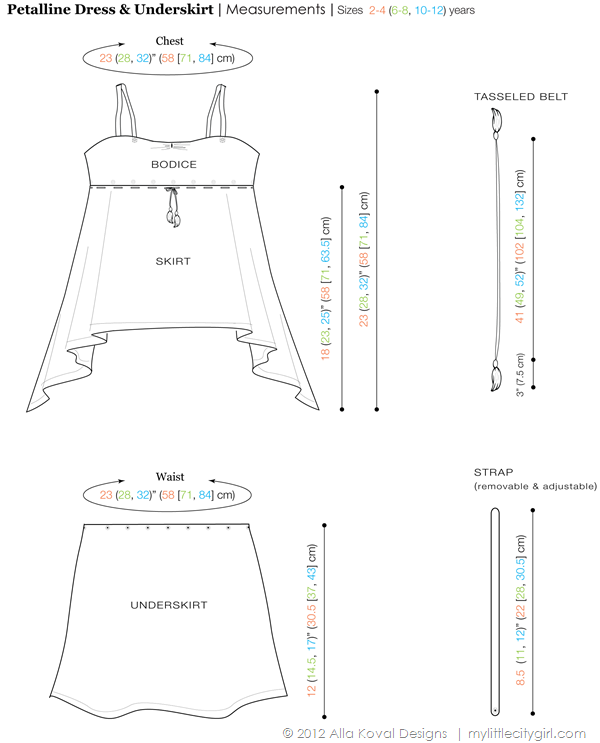
And below is sneak peek of my ~one more realized dream—I can draw LOL!! Well, even if it’s just simple schematics in Illustrator, but who knows ;o)
A wonderful and lovely Tuesday everyone!! We have 4th day of summer here (finally!!!!), so definitely enjoined it! :o)
Alla Koval Designs
Sneak Peek & Question to You
| July 2, 2012 | Filled under My Book, Writing a book |
Would you like a sneak peek of my new style crochet diagrams, made with Adobe Illustator SC5—the best and most friendly drawing software ever! I really can’t describe how happy I am with even though I am still learning how to get max comfortable with such variety of Ai tools.
As I said before, I always loved stitch diagrams – the international language of crochet and knitting not only because they are more clear and easier to read compared to written instructions, but also because the patterns really do not need to be translated to any other language.
And I pay a lot attention to every detail and play with the styles to find the sharpest one.
But before take a decision which version is better, I would love to hear your opinion first.
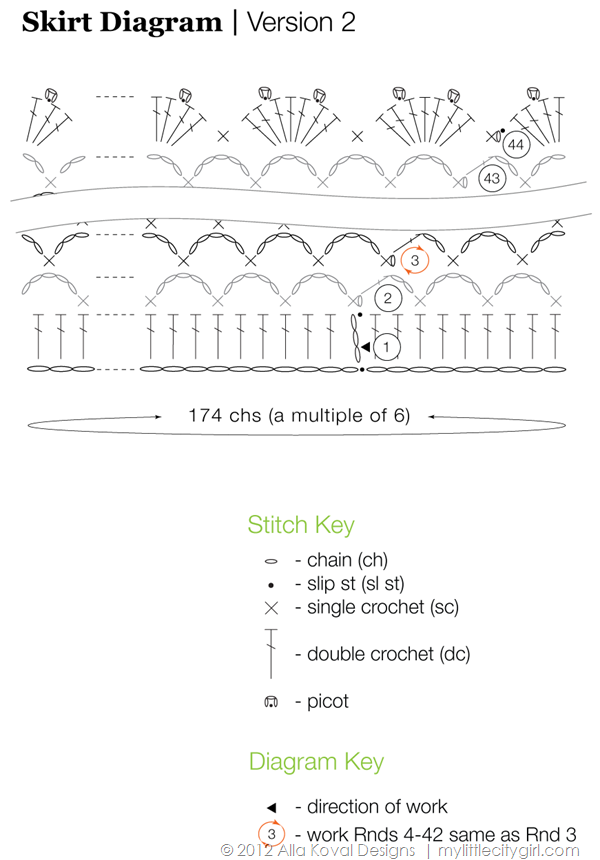
Below are 2 versions of crochet diagram for pretty simple skirt/tube, worked in rounds in (ch 5, sc) pattern and shell edging.
So the question is: which version (Version 1 or Version 2) looks more clear for you? If none of these look clear to you, please explain why. And if you would like something to be changed please say so.
Thank you so much for your time!! Every one Your opinions will count and be much appreciated!
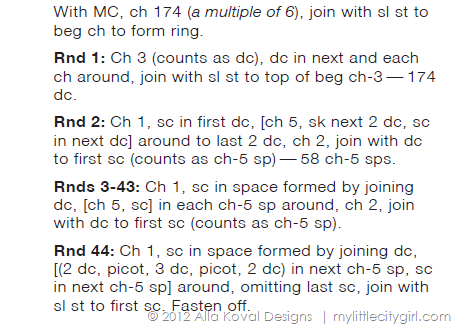
But if you prefer written instructions – sure they are available and included too (written in US English as all my patterns):
In the news
| June 25, 2012 | Filled under Creations, Writing a book |
Just a quick update that Petalline Halter Dress pattern is done as well and another 4 book projects and patterns using that same gorgeous motif.
All patterns will be send to tech editors today and right after I get them back, they will be released – yes, I decided to make them available before the book will be published. Stay tuned for more details ;o)
And above is current book pattern, I’m working now.
Yes, I know… it took me almost a year to get back to this project, but later is better than never I hope ;o) I also would like to thank you so much for your patience! This is going to be a vest (as shown), waist jacket and coat (as I promised)…
And most excited news (I guess) that is one more pattern, which will be released before book published. So, you will have 2, really volumetric patterns with endless possibilities and variations… just in near future (read—as soon as possible)!
Happy and productive Monday everyone!!
Alla Koval Designs
Sneak Peek
| May 8, 2012 | Filled under Creations, My Book, Writing a book |
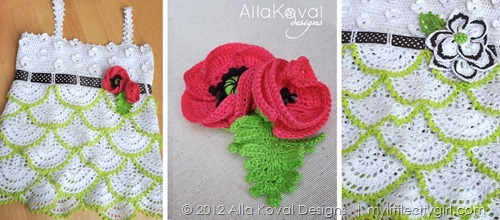
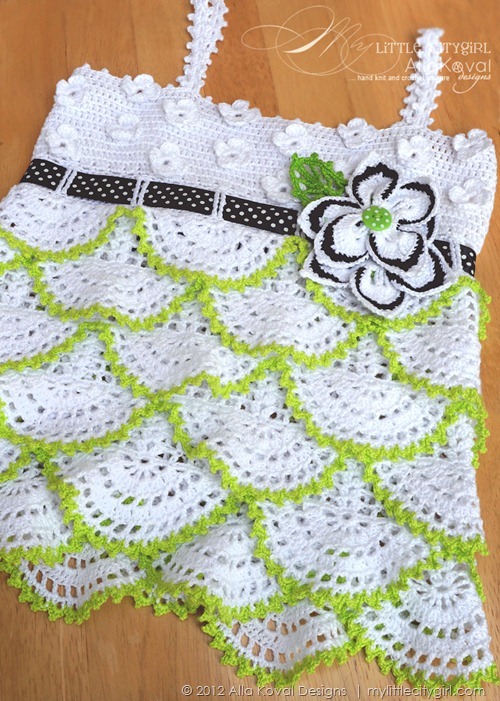
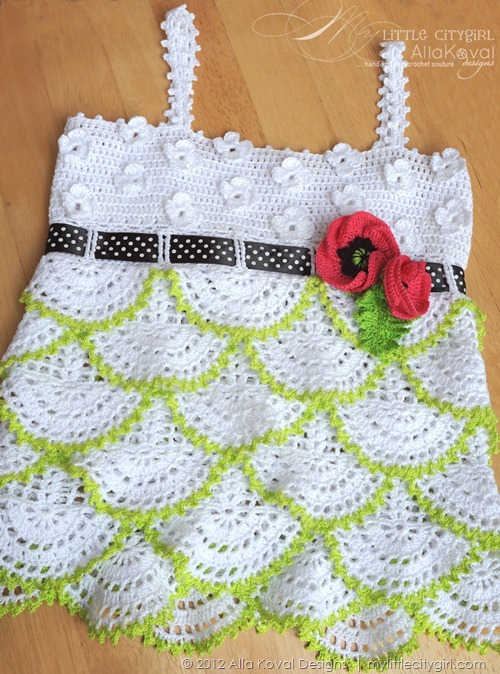
[dropcap]I[/dropcap] am thrilled to show you my first tank top for our new collaboration with amazing Francoise Lama-Solet for the cover of the summer issue of Wee Style Magazine adorable Mya and Autumn will be modeling.
Also I’m also pretty excited about this my scallops pattern! And mainly because the scallop motifs are crocheted in one piece with minimal joining and weaving, making this top an easy and fun to make. The bodice is also worked in one piece with crocheted darling flowers as you go.
The scallops can be turned in any theme you may think of – ocean, cruise, romantic, tropical bright aka rumba, where each layer is crocheted in contrasting color… well, just to name a few! Francoise and I decided work in floral/butterfly theme, so I’ve turned my scallop top into base top with scallops edgings in neon lime – not only pretty popular color this season, but also a color, which gives such fresh look and will fit most everything perfect.
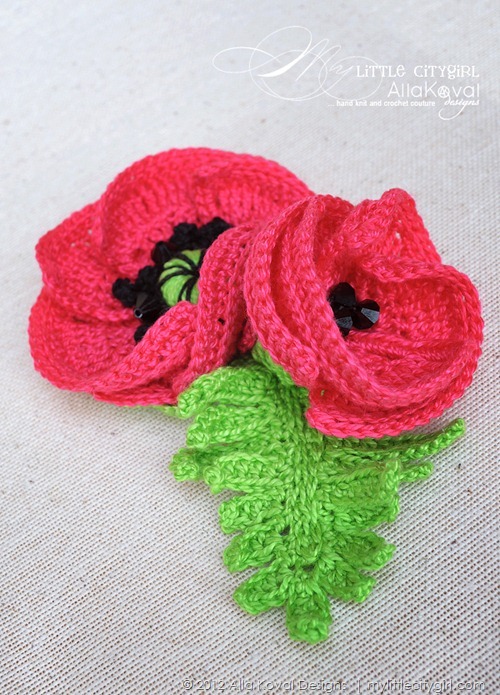
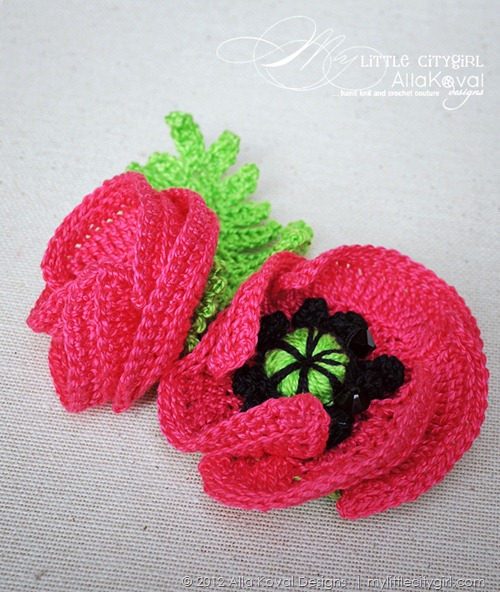
P.S.: Yes, I consider to add this top and new poppy pin patterns to my book ;o)
Alla Koval Designs
Market Yourself
| May 3, 2012 | Filled under Entering, My Book |
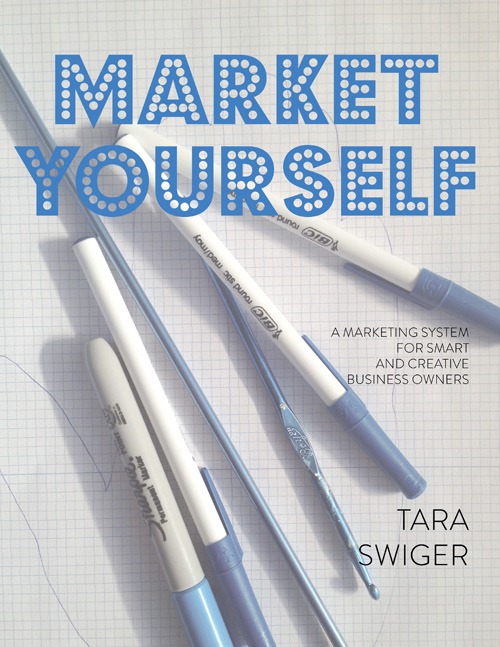
Market Yourself: A Marketing System for Smart and Creative Business Owners is more than just a book about marketing — it’s a book about YOU. Your strengths, your weaknesses, what makes your product unique and good and worthy of an audience. In its 150+ pages, you’ll find more than 30 hands-on worksheets designed to take your business forward, fast!
Advance praise for Market Yourself:
[quote author=”- Diane Gilleland”] Do you love to make things, but hate the idea of marketing them? Take a deep breath, make some tea and spend some time with Tara’s book. She’s a gentle, encouraging guide through the landscape of promotion. You’ll build yourself a marketing plan that’s both comfortable and doable. [/quote]
[quote author=”- Kerry Burki”] Market Yourself takes your passion for making to the next level by teaching you step by step how to get your product into your buyer’s hands. Tara encourages and inspires but ultimately challenges you to create the growth you are looking for in your business. You will be amazed and intrigued by what you begin to learn about yourself as well as your brand. [/quote]
[quote author=”- Shannon Okey”] I really believe that this book is a logical successor to the Guide and one that will definitely help you rethink what you’re doing as a creative business person. Tara is from the yarn/craft world, so she really gets it! [/quote]
Sounds pretty interesting. Just got my copy in PDF, which is shipping already. If you would prefer the print edition + PDF instead, those will start shipping in another week or two.
Alla Koval Designs
Trade Secrets à la Koval. Crochet Symbol Charts with Adobe Illustrator CS5
| February 26, 2012 | Filled under My Book, Trade Secrets à la Koval, Writing a book |
Even if I get asked a lot about how I draw my crochet diagrams, just about a week ago I started to use Adobe Illustrator and I really can’t describe how I’m happy with this drawing software and with a new and exactly look of my diagrams I wanted!! And as I promised, I’m so glad to share some helpful links and tips, which helped me a lot. So, let’s go!
Get started
If you don’t have this software, you may want to try trial version of Adobe Illustrator® CS5 first, which is fully functional and offers every feature of the product for you to test-drive. To get started, I would highly recommend Illustrator CS5 Essential Training by lynda. Take your time to watch this course, which includes a detailed explanation of the elements that make up vector graphics, and shows how to use each of Illustrator’s drawing tools. It’s really matters to pass first learning bumps and get comfortable with Ai tools first of all.
Creating crochet charts
To create the charts you will need a library of crochet symbols first of all. You have two options: create your own or purchase a crochet font like StitchingCrochet (or ready-made library if any is available for sell). Below are links to amazing video tutorials how to create diagrams in rounds using StitchinCrochet font by BayviewPaula (sure this technique will work for your custom created symbols too):
StitchinCrochet Tutorial: Part 1
StitchinCrochet Tutorial: Part 2
StitchinCrochet Tutorial: Part 3
StitchinCrochet Tutorial: Part 4
StitchinCrochet Tutorial: Part 5 (final)
Many thanks to Paula for such helpful and clever tutorials! It’s really everything you need to know for creating your very first crochet charts.
Making a library of crochet stitch symbols
Creating your own library of stich symbols makes a sense for several reasons:
- Custom style (stroke weight, cap, corners, etc.)
- Flexibility of work with symbols (to transform, change proportions):

![]()
- Ability to create any customs groups of symbols like petals, shells, etc.
- Create all symbols you needed (StitchingCrochet has most of them, but not all). Well, you may use both: font and partial library to adjust styles.
- Using cool tools (like Blend tool), which doesn’t work with fonts.
Amie, from Nexstitch, has great detailed tutorials on using Adobe Illustrator to create symbols and diagrams on her blog.
Below is a part of my library of symbols, which were created with Line Segment tool ![]() and Ellipse tool
and Ellipse tool ![]() . Make sure the symbols have same Width (mine are 25 px wide) and proportional Height values (sc – 25 px, hdc – 50 px, dc – 75 px, etc.). New Width and Height values can be specified in the Control panel at any time if needed.
. Make sure the symbols have same Width (mine are 25 px wide) and proportional Height values (sc – 25 px, hdc – 50 px, dc – 75 px, etc.). New Width and Height values can be specified in the Control panel at any time if needed.
Creating Shells
Probably there are other and more easy ways to do that, but so far I made Shells by using Envelope Distort.
[one_half]
[dropcap]1[/dropcap] Create a group of 5 dc and 2 hdc, transformed as shown below (click pictures to enlarge).
[/one_half]
[one_half_last]
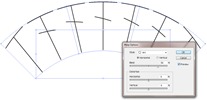
[dropcap]2[/dropcap] Select all elements with Selection tool ![]() and go to Object > Envelope Distort > Make with Warp. In the Warp Options dialog box, select a warp style Arc. Click Preview check box to see the changes.
and go to Object > Envelope Distort > Make with Warp. In the Warp Options dialog box, select a warp style Arc. Click Preview check box to see the changes.
[/one_half_last]
[one_half]
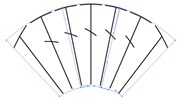
[dropcap]3[/dropcap] Change Bend and Vertical Distortion parameters to get shape close to this (Blend: 30%, Vertical: –34%).
[/one_half]
[one_half_last]
[dropcap]4[/dropcap] Adjust size as desired. To reshape the envelope, drag any anchor point on the envelope with the Direct Selection tool ![]() if needed.
if needed.
[/one_half_last]
Creating charts of a row projects
I work on Sunlit Rose Bolero pattern now and will show you one of the ways how to create diagram in rows, especially if row is 193 sts wide.
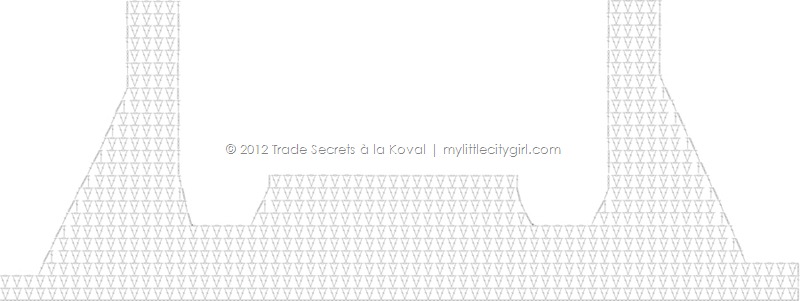
NOTE: I work on a PC in Adobe Illustrator CS5. The set up on a Mac looks a little different and the keyboard shortcuts are different too.
[dropcap]1[/dropcap] Open up a new document File > New. Call it “Body Chart” for example.
Set up options:
- New Document Profile. Choose Custom.
- Size of document. To calculate a Width of document (important for Blend tool), simple multiply a width of ch (25 px) by number of chains (194): 25 px x 193 = 4825 px. For a High – set up 3000 px (it can be easy changed at any time if needed). Click OK.
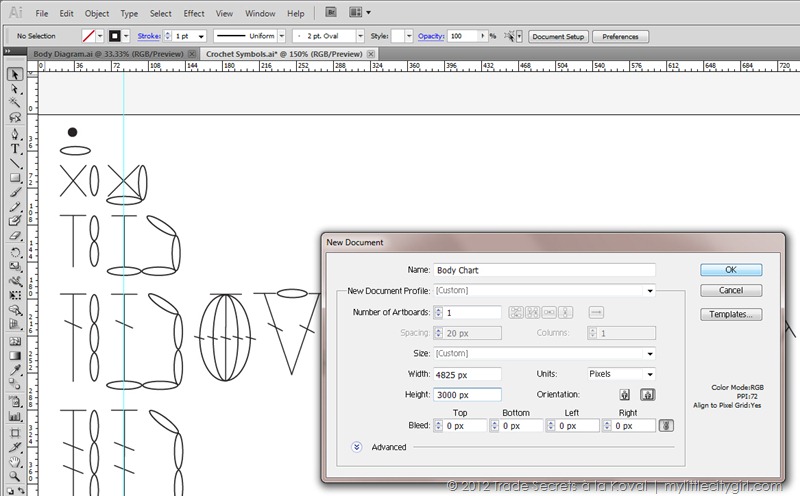
[dropcap]2[/dropcap] Creating beg ch of 193 chs with Blend Tool.
First, start out by copy (Control + C)/pasting (Control + V) a chain stitch from a library of symbols to Body Chart document. Mine is called Crochet Symbols.ai (see screenshot below – highlighted in green). Zoom in to see it closer (look in the bottom, left corner of the workspace). Select a chain stitch with Selection tool ![]() and move a chain to lower left corner by set up next options:
and move a chain to lower left corner by set up next options:
- Reference Point (click at lower left corner of Reference Point icon)
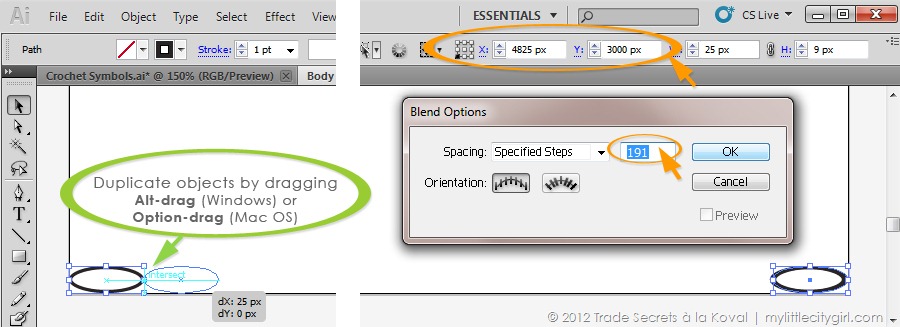
- Set up X and Y value: X=0 px; Y=3000 px . This first chain is start of the blend.
[dropcap]3[/dropcap] Duplicate a chain by pasting (Control + V) or by dragging (my absolute favorite tool so far!): select a chain and Alt‑drag (Windows) or Option-drag (Mac OS) the selection. Set up for second chain (end of the blend): X=4800 px (4825 – 25); Y=3000 px. Set blending options by double-clicking the Blend tool ![]() or choosing Object > Blend > Blend Options. Spacing determines how many steps are added to the blend. Choose Specified Steps and set up 191 (2 chains we have already). Click OK.
or choosing Object > Blend > Blend Options. Spacing determines how many steps are added to the blend. Choose Specified Steps and set up 191 (2 chains we have already). Click OK.
[dropcap]4[/dropcap] Select both objects (chains). Choose Object > Blend > Make. Beginning chain is complete. Change layer name to Ch 193 or Beg Ch. Block layer to prevent any accidental changes (optional).
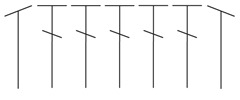
Some more ideas of using Blend tool. Add new layer. Rep steps 2-3, but with dc stitch and set up Spacing > Specified Steps = 95. Then choose Object > Blend > Make. You will get dc located in “every other” order.
Then create new layer. Rep steps steps 2-3, but with chain stitch placed between first two (X=25 px) and last two dc (X=4800 px). Set up Spacing > Specified Steps = 94. Then choose Object > Blend > Make. You got a row of Mesh pattern in a minutes, don’t you! Yes, you are right – here should be a beginning ch-4, but I’m not finished ;o) So, let’s go back to our Body Chart.
[dropcap]5[/dropcap] To add beg ch-3, you need to resize the artboard (add extra width value to the right). Select the Artboard tool ![]() , click to select an artboard. To resize the artboard, position the pointer on an edge or corner until the cursor changes to a double-sided arrow, and then drag to adjust. Or, specify new Width and Height values in the Control panel.
, click to select an artboard. To resize the artboard, position the pointer on an edge or corner until the cursor changes to a double-sided arrow, and then drag to adjust. Or, specify new Width and Height values in the Control panel.
[dropcap]6[/dropcap] Add new layer and name it Row 1. Copy (Control + C)/pasting (Control + V) a chain stitch from your “library of symbols” to Body Chart document. Align a chain stitch to the beg chain (you should see the word, “intersect” in blue).
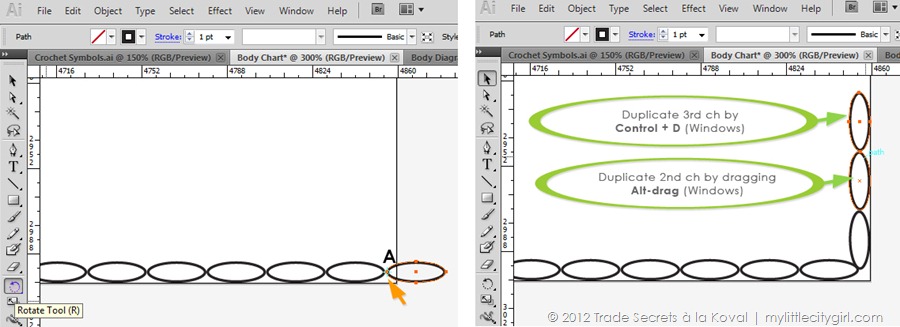
Select the Rotate tool ![]() .
.
- To rotate the chain around point A, click once in the document window in point A to reposition the reference point. Then move the pointer away from the reference point and drag in a circular motion, holding down Alt (Windows) after you start to drag.
- Duplicate 2nd chain by dragging Alt-drag (Windows).
- Duplicate 3rd chain by pasting (Control + D). Group beg ch-3.
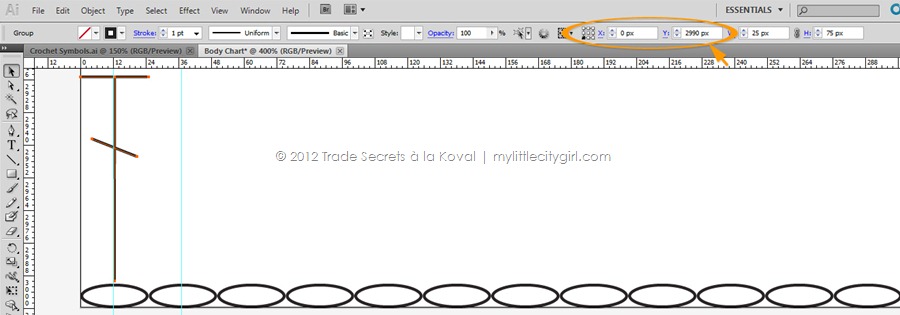
[dropcap]7[/dropcap] Copy (Control + C)/pasting (Control + V) a dc stitch (Wight value = 25 px, Height value = 75) from a library of symbols to Body Chart document. Set up: X=0 px, Y= 2990 px.
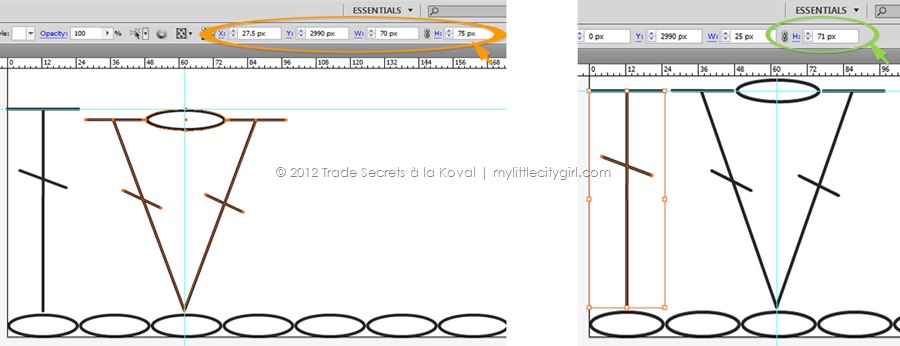
[dropcap]8[/dropcap] Copy (Control + C)/pasting (Control + V) a V-st stitch (Wight value = 75 px, Height value = 75) from a library of symbols to Body Chart document. Set up: X=25 px, Y= 2990 px. Adjust Width and Height values of V-st: Width = 70 (to make a space between V-st symbols of 2.5 px from each side); Height = 75 px. Adjust Height value of dc: Height = 71 px.
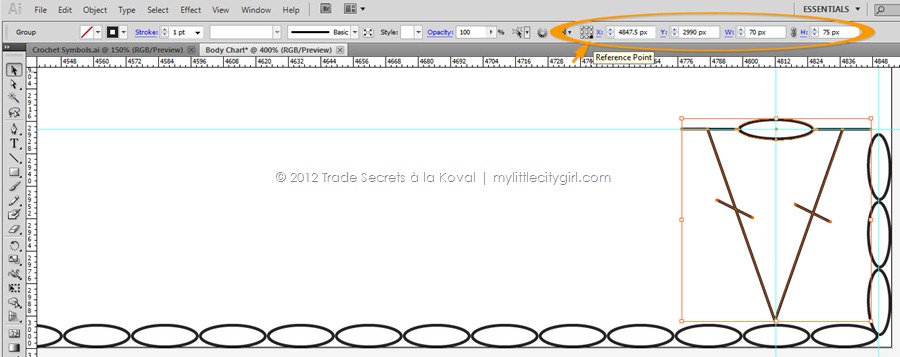
[dropcap]9[/dropcap] Duplicate V-st by dragging Alt-drag (Windows). Change Reference Point by clicking at right lower corner of Reference Point icon. Set up for V-st: X=4822.5 px, Y= 2990 px.
[dropcap]10[/dropcap] Set up blending options: Spacing > Specified Steps = 62. With Selection tool ![]() select both V-sts. Then choose Object > Blend > Make. To make second row, duplicate layer Row 1 and change beg sts. To make short rows, duplicate 1st V-st by dragging Alt-drag (Windows) and then duplicate symbol as many times as need by Ctr + D.
select both V-sts. Then choose Object > Blend > Make. To make second row, duplicate layer Row 1 and change beg sts. To make short rows, duplicate 1st V-st by dragging Alt-drag (Windows) and then duplicate symbol as many times as need by Ctr + D.
Looks as I’m completely hooked! ;o) To be continued…
[quote author=”- Amy Chua”] Nothing is fun until you’re good at it. [/quote]
Writing a Book—a Personal Experience. What’s new
| February 20, 2012 | Filled under Entering, My Book |
First, I’ve added “My Book” to main menu and set up the categories to keep the posts organized:
- Helpful Links (whatever links I’ll find helpful or worth remembering related to the subject)
- Entering (referring to my first venture in book publishing)
- Writing a Book (everything related to writing a book: crochet patterns, charts, title, cover copy, etc.)
- Publishing a Book (figuring out the different publishing activities and concerns and writing about my publishing experience)
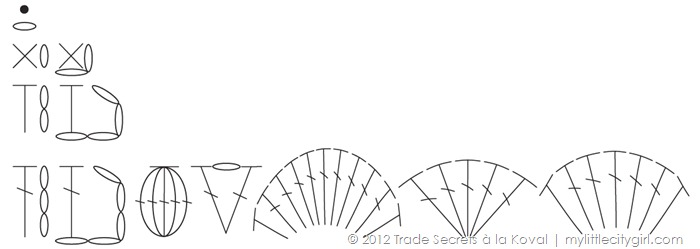
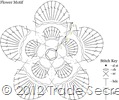
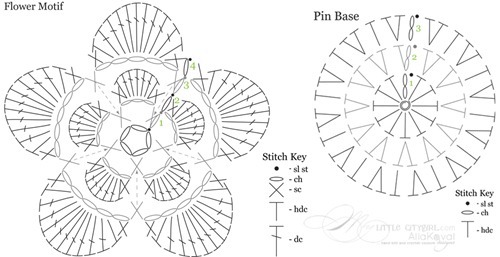
On top of that I can proudly report a bit of progress: I’ve solved my old tough problem – find a professional crochet charts software. Once I realized that this software should be vector based then it was obvious that I was looking for a subset of Adobe Illustrator’s functionality (or Corel Draw or Inkscape (free one) or similar vector graphics application). So the name of “professional crochet symbols software” is Adobe Illustrator and I really have no idea why it took me so long to figure it out and I’ve spent hours to draw my charts (just don’t ask me which application I’ve used before LOL). And once you pass first learning bumps and got comfortable with Ai tools – it really takes minutes to draw the charts like these ones.
Seriously. It took me less than 2 days to watch video lessons and create my own library of crochet symbols. I’ll post great helpful links and tips how to get started late this week.
And to celebrate this “outstanding” event :о), I’ve turned this first flower chart into Dewdrop Flower Pin free pattern, which I’ll list just in few. Stay tuned.
It’s official!
| February 13, 2012 | Filled under Entering, My Book |
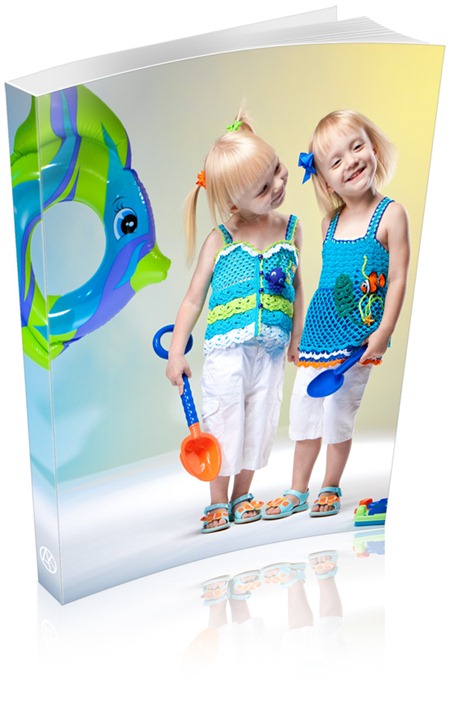
[dropcap]Y[/dropcap]es, it’s official. Let my very first book publishing venture begin! Exciting and scary a bit. Not scary actually, but it’s a kind of good challenge. Publishing a book has been on my to-do list for quite some time, but I’ve resisted writing a book in the past. Not only because I just hated the idea of working on a project for months without anyone seeing even a sneak peek, and without individual pattern releases I usually do monthly. But mainly, in order to put out a quality book, I wanted to learn as much as possible about everything related to writing and self-publishing patterns first. And with gained experience and a number of released patterns I feel ready for this new adventure. I love to challenge myself and discover new things. And one of the biggest challenges so far is to try to get enough thorough the knowledge of the publishing industry and produce the exact book I have in mind.
I decided to write about my publishing experience and share most interesting findings and tips here on my blog. Everyone is invited and very welcome to join! Please feel free to share your publishing experience, links to your published books, funny stories, your thoughts, or even ask the questions you may have. So, let’s go! Below are some info and answers on very first questions I guess you may have.
A knit or crochet book?
See picture above ;o) Well, probably I should start with “knit vs crochet” book, but with Judy, Aeysha, Sarah and all of you, my crochet buddies in mind, I decided to start with a book of crochet designs. The book is about creativity, imagination and inspiration. More details to come…
Why self-publishing
The decision to self publish wasn’t a hard one for me. I love learning and perfecting new skills, and I hope I have most of the skills needed to self-publish that I had gained over 3 years of releasing patterns. But to meet the level of skill required to put out even a quality single pattern, the important thing to remember is that you want it to look excellent (especially if self publish), and if you aren’t passionate in photography or aren’t good with layout, consider on collaborating with the professionals, who can do it flawlessly. Look at the cover, even if it’s just rough draft so far. This was one of our very first collaboration with incredibly talented photographer Alex Koloskov and retoucher Genia Larionova and their absolutely precious twins Sophia and Liliana.This photo was taken about a year ago, and still melt my heart every time I see it as well as many others taken by this amazing team and creative souls!
I also love the flexibility of self-publishing and being able to control what goes into the patterns.
And most important for me, is that I have an opportunity to work and produce the exact book I have in mind.
When to expect the book to be published?
I’m not a big fan of deadlines, don’t you? But I have pretty strong schedule and business plan, which is not only gives clear understanding of the steps you need to take to self publish a craft book, but also keeps you pretty organized.
I’ll keep you updated.
[quote author=”- Fern Reiss, Publishing Game: Publish book in 30 days”] If you want to create a business, first you need to create a business plan. Otherwise, you will never have more than hobby.[/quote]
My Portfolio, finally!
| January 15, 2012 | Filled under Entering, In The News, My Book |
Even if portfolio is that “Must have” thing, I never had a chance to work on it or ever make a try. I wish I knew that to create pretty simple but stylish and elegant portfolio is possible in less than 2 days…
… and will cost only $37! I love minimal and clean design style and felt in love with peerapong’s premium themes for WordPress immediately. Very easy customizable themes with such stylish and cool features!
Well, probably I’ll be back to work on OOAK design style of my portfolio in some of days, but so far I’m really happy with this one ;o) My portfolio is available at Alla Koval Designs (or click Portfolio in Main menu, here on My Little Citygirl)
Also, I would like to thank you to my friends and incredibly talented artists, especially Annya Uslontseva, Alex Koloskov and Genia Larionova (and their lovely twins girls!), Natasha Titanoff, Christie Archer, Angela Owens and everyone I was lucky to met and work with! I appreciate your kindness, support, and talents very much and I am grateful for all you do.
Sincerely yours,
Alla Koval Designs








 Shopping Cart


Lets Get Connected